Wednesday, June 30

Slowcooker Recipe: Potato and Leek Soup


Brrrr how chilly is it at the moment? The temperature in chilly frilly hills is going to be 2 - 13 degrees c.  That's cold enough for me!  I see myself baking this afternoon - what a perfect excuse to keep the house warm right?

If you have leeks and potatoes at home, maybe you want to chuck this on at lunchtime or before, have lovely soup and bread for dinner - some leftovers for lunch perhaps?  It's super easy and because it is potato, you  can usually convince the kids to have a try.  Eloise had seconds of this.

We served our with french baguettes.


Ingredients:
1 kilo of peeled and sliced.diced potatoes
2 large leeks - cut, cleaned and diced
20g butter
750ml (3 cups) chicken stock (vegetable stock if you wish)
1/2 tsp black pepper
1 tin evaporated milk or 2/3 cup cream

Method:
In a saucepan, melt your butter and add leeks, sweat off - ensure they become soft and translucent.

Put your potatoes in your slow cooker then add leek, stock and pepper

Set onto high for 3 hours or low for 5-6 hours.

20 minutes before serving, and transfer the mix to food processor, whizz until smooth.  If you have a bamix stick blender you could use this too directly in the pot (turn off the power first to the slowcooker).
At this point add your cream/evaporated milk and then return to the stock pot to do a final heat up for 20 minutes.

Serve!

Tuesday, June 29

Useful Resource for parents of NSW pre-school and primary school kids:


We just got our school reports and Eloise's was delightful.  She's enthusiastic, inquisitive and articulate.  She's an excellent reader and is improving her handwriting - but this is an area we struggle with - she does have a tendency to transpose letters - y, g, b and d are the worst ones so with a bit of searching I've found the NSW Foundation fonts for free download - you can download it too from here.

What I love about this is we can now make sheets at home and get the little frills more school-ready by making 'trace-sheets' using the Foundation - dot font.  Wonderful for perfecting the name writing at least for the little frills.

Here's some great info from the NSW Board of Studies about handwriting curriculum and helping your child at home with handwriting.

Couldn't keep this wonderful information to myself, I just had to share it, let others know too!

The 'lucky if you have any cake mix left' cake - Banana and coconut cream..


A few of my readers may have already tried this one, it's been made famous on a few online forums by a very clever chickie, Cathy.  I have tweaked it a little to make it lunchbox friendly..

I've made this so many times I can't even count - I've made in round cakes, cupcakes, loaf cakes.  It's super versatile.  It's silky smooth on the inside and makes a lovely crust.  But beware. Do not, I repeat, DO NOT eat the mixture.  Once you start you might not be able to stop, and soon you'll only have enough for a few or maybe no cupcakes.....

You can serve it with or without icing... again no icing makes it lunchbox friendly, but I do love the icing too!


Ingredients:
2 eggs
100 grams softened butter
2/3 cup castor sugar
1 ½ cups SR flour
2/3 cup desiccated coconut
3/4 cup coconut cream
1 tsp vanilla essence
1 cup mashed banana (2-3 ripe bananas)


Method
Preaheat oven to 160oC  and grease your cake tin

Cream your butter and sugar

Add your flour, coconut cream banana, eggs and vanilla essence, mix well then lastly add your dessicated coconut. Whip for about 1 minute until lovely and fluffy (try not to eat, I dare you!)

Pour into tin and bake for approximately 1 hour


Icing
Whip 1/4 cup coconut cream and 50g cream cheese with electric beaters, add about 2 cups icing sugar until a lovely thick consistency.  Pour about half on your cake.  Eat the rest or freeze it for your next cake, because after eating the first one, you'll need another.. or save for some cupcakes :)

Monday, June 28

Boo Boo Buddy Giveaway


Yesterday you might have read we had a little mishap at the park when riding the bikes - nothing too serious - just some swelling and likely to be a bruised ankle - she's walking on it fine.  Luckily we have a first aid kit at home and in the car, but I realised I don't have one in our/my bag.

Then I remembered that the lovely Nat over at Totally Mums and Bubs sells a really cute 'Medi Buddy' that won't fall apart in my bag like the last box of band-aids!.  So I now have one on it's way.  Nat also offered very kindly to do a giveaway this week (see, YOU benefit from MY purchases -hehe)  of these gorgeous Boo-boo buddies!

They're like little gel cool packs that are reusable, non-toxic, hypoallergenic and completely safe to use. I find them useful for 'those days' when everything is a drama and instead of going through copious amounts of barbie bandaids - boo-boo buddy does it every time.  Also great at vaccination time.

They come in tons of fun shapes and designs - check out Totally Mum's and Bubs range here.


So how do you want to win a twin pack (i.e. TWO packs) of boo-boo buddies worth $19.90 +postage?

Boring bits
The winner will be announced on Friday 2nd July... yes, it's a quickie!
Prize will be posted to Australian addresses only
There needs to be some way of contacting you through your comment, so leave your email address if it doesn't track through to your blog :)


GOODLUCK!

The busy woman's cannelloni - cheaty, cheaty, CHEATY.


Now, you know I'm not a fan of the packet mix, but I do understand there are times where you may be short of time and enthusiasm and you'll be tossing up: 'Packet meal or take-away'?

So I got to thinking about it the other day - something easy with a few ingredients - but you can still be creative.

I came up with this.  If you make your own pasta, it doesn't take much longer to make it - but not everyone does so I thought I'd road-test the pre-fab type (I'd never had it before this point!).  You could also pre-make them and put them in the fridge overnight and through the next day and pop into the oven when you get home/at prescribed time.

If you don't like italian sausage - substitute with any sausage that you love - even soy ones!

Now my friends, I made two at a time, because this is how I roll.  I like to have a stash of food for another lazy or busy day - feel free to cut the ingredients in half..


Ingredients:
1 packet Latina lasagne sheets (easier to shape up than the cannelloni ones I reckon)
700 g italian sausages
150 g ricotta cheese
250 g tasty cheese
2 x 500g jars pasta sauce
200 ml water

Pre-made bechamel sauce OR
40g butter
1/4 cup plain flour
400 ml milk


Method:
Preheat oven to 200 degrees c
Mix your pasta sauce with the water, spoon about 1/5th of it on the bottom of your baking dish and set aside.
Flatten out lasagne sheet and spread ricotta on with a knife

Sprinkle a small handful of tasty cheese over it (or get the kids to)

Skin your sausages by 'gutting them' - edge tip of your knife under the skin at one end, the knife blade facing upwards, continue along to the end, and then peel back the skin.  Place in a row along the centre of the lasagne sheet.

Roll up lasagne sheet around the sausage.  Cut into lengths to fit your casserole dish.  Continue until done.


Pour the rest of your pasta sauce over the top and then top with your bechamel* and remainder of your cheese.

Bake in oven for 35-40 minutes.

*to make your own bechamel, melt your butter in a saucepan over medium heat and have a metal whisk and milk on standby.
Add flour and a little milk and whisk until it thickens, keep adding milk and whisking whilst it thickens and so on until all milk is in the pan.

So my friends, if you're feeling you've got a bit of 'Monday-itis' happening - this could be your saviour!

See you this afternoon with news about our giveaway!

Sunday, June 27

This weekend's highlight...


Eloise fell over on her bike (not the highlight)
and wedged her ankle between the chain mechanism and cover and the pedal (not the highlight)
 She was screaming her little heart out I thought she had broken it (definitely not the highlight)

Hubby had to take apart the bike to release it (phew for socket set in the car) it took 15 long minutes.

She was so grateful, we went to the supermarket afterward and she stuck by his side like glue, hugging him and looking at him like he was a superhero. She was positively beaming.

 He was chuffed too. It was such a lovely moment between the two of them.
 Made my heart go pitty-patter!

What was your highlight?

Sunday Baking Project: Sweet and Savoury Pretzels


There's a genuine Bavarian bakery about 15 minutes drive from my house that we happened upon one day on our way to somewhere else.  It's kind of hidden away but is well known amongst bakers and has enthusiastic and much return patronage by bread-lovers and locals alike.  Get there at midday on a Saturday and they're almost sold out!

They use genuine Bavarian bread recipes which made my hubby giddy with excitement.  Why?  Because he comes from a long line of Bavarian bakers.  His maternal grandfather and great uncle were both bakers, as was their father.  Hubby grew up on the bakery floor, quite frequently going to work with his grandpa and sampling the many treats that were made in their small country town.

Hubby's grandfather and great uncle have since passed away but when we visit the little town for nostalgia's sake we drop into the bakery which hasn't changed its decor at all.  They now serve the regular bakery fare, which is a bit sad.

Anyways, hubby's fave thing to pick up at the bakery is the genuine pretzels.  With rock salt , caraway or pumpkin seeds.  I like pretzels too, so I thought it high-time to try them at home.  Of course I never imagined I'd get anywhere close to the perfection from the bavarian bakery but my, they are yummy and great to stash away for yummy breakfast re-heated in the oven of just cold as a snack.  You can vary how you dress them to make them sweet or savoury.

Definitely submitting this to yeastspotting!


Ingredients:
150g wholemeal flour
450g plain flour
1 tsp dry yeast
1 tsp salt flakes
425ml warm water
2 tb olive oil.


Method:
In your mixer or a bowl add all dry ingredients.
In a separate jug, add the olive oil to your water.

If using a mixer with a dough hook, gradually add water until it makes an elastic and well mixed dough, knead for about 3 minutes.

If kneading by hand add half the water straight up and mix well, gradually add the remaining water/oil until you reach an elastic consistency, about 10 minutes by hand.


Place in oiled bowl, cover with clingfilm and leave to prove for 3 hours.

When risen, knock the air out by kneading gently by hand and divide into 12 equal portions.
Cover 2 baking trays with baking paper.

Make your pretzels by rolling a portion into a long sausage, about diameter of a 1cm, and a length of about 30cm.

lifting ends upwards twist around each other twice and pull edges away from each other

Flip the bottom loop over the top of the twist and press it down to become a pretzel shape.

Set aside whilst you make the rest.

Preheat oven to 200 degrees c
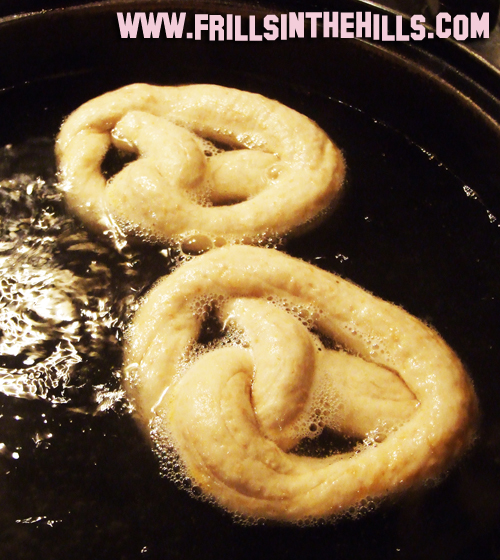
Then in a frypan, add 1 litre of water and 75g of bicarb soda, bring to a boil and then set to a simmer.

Add the pretzels a couple at a time and let simmer for approx 30 seconds, turn over and simmer for a further 30 seconds.  Remove from pan, drain well and put on your baking tray.


When baking tray is full (6 bagels) you can choose to season if you like.  At this point sprinkle either:
Maldon salt for plain pretzel or poppy seeds/sesame seeds if you wish.
I added brown sugar and slivered almonds to a couple too.

Bake in the oven for 6 minutes, turn over and bake a further 6 minutes.

Another option for seasoning your bagels is brushing/glazing with butter or flavoured butter after they have been in the oven.  I buttered a few with butter with cinnamon, plain butter, and butter and dijon mustard.

Store in airtight container for up to 5 day or freeze for 2 months.

Saturday, June 26

Snap Happy Saturday: Come ride with me (pics and video)


This week Laura and Olivia graduated to two wheels and training wheels!  


And Eloise graduated to two wheels with no training wheels!


Here's the videos - Laura and Olivia
The 'crash scene' funny!


Have a lovely weekend all!  See you tomorrow for Sunday baking project! xx

Friday, June 25

Lemon Delicious


If you haven't had this, really, you haven't lived.   This is so yummy, it is the winter comfort food ultimate.  

Easy to make - foolproof really, and absolutely moorish.  Great news is that it uses kitchen staples and so no special trips to the supermarket!

As you might know, last week I was without an oven.  Yesterday 'the part' finally arrived. That, or my repairman thought it was easier to fix it than to take out an AVO on me.  I'm a happy girl now my oven is working again... you just don't realise how much you use something until you don't have it do you?

So this recipe was made at my bestie's house last weekend.   She has a mix-master and let me tell you I nearly killed myself using it!  Changing the position of the bowl guide was my first mistake!  


Ingredients:
(the pictures here show double amount of recipe ingredients, to feed 10, this recipe serves 4-5)
60 g butter
3/4 cup castor sugar
Zest and juice of 1 lemon
1/2 cup self-raising flour
1 tablespoon grated lemon rind
2 eggs, separated
1 cup milk


Method:
Preheat oven to 180 degrees c fan-forced
Whip egg whites until they become stiff peaks, set aside.

Cream butter and sugar together, and then add lemon zest and juice then egg yolks, and finally flour and milk

Fold through the egg whites

Pour into greased baking dish.

Bake for 30-40 minutes, until brown on top, check with skewer, it should form a cake texture on top and the bottom 1cm or so should be syrup.

Serve with fresh cream or icecream, and a little sprinkling of icing sugar if you wish..

Season Savvy Challenge Week 4 - Lemons


I realised recently I must be mad about lemons. I have loads of recipes with them but I realise there's a lot I haven't tried. Like I'd like to know how to make candied lemons for example, also lemon sorbet is one of my faves and I haven't made that yet.. and then we get into lemon chicken.. see? Lots.

There's loads of variations of each recipe, so if you see two submissions for seemingly the same recipe, odds are they are quite different - that's what I love the about the www!

A friend of mine has a tree that's just busting with fruit so luckily I've got a ready supply of lemons - so add some recipes - odds are I'll try it!

I'll be back with lemon delicious this afternoon!


What is Season Savvy?
I'm all about using seasonal produce. When it's good. When it's plentiful, when it's cheap.

Each week I'm challenge you to use a particular piece of produce that is SEASONAL. Now if you're in a different season to me, don't panic. Maybe you have cooked something before with this ingredient, add it and play along....

Hopefully this way, we can use this as a bit of inspiration/education and show off what you can cook, and save some moulah!


So what do you need to do?
1. Find a recipe you love or a way you love to eat lemons - it doesn't need to be the main ingredient, but it needs to be in the dish.. and it doesn't need to be fancy either!
2. Make it or find the link
3. Photograph it and/or share the recipe
(it doesn't need to be-step-by-step photos!)
4. Post your link down there with the Linkytool down below
5. Get visited, and visit other people's recipes!

Thursday, June 24

Guest Recipe Post: Pumpkin and Kumara Salad


Hello again

Season Savvy has been huuuuge this week.  24 recipes and counting.. no.   Make that 25 and counting, because this, my friends, is the 25th link up.  It seriously amazes me how people are using produce with such versatility and creativity!  Keep them coming!

This post is from regular visitor and commenter Kirsty.    Kirsty doesn't have a blog (yet!) but sent me her favourite pumpkin recipe for me to share with you all - thank you Kirsty!


Pumpkin and Kumara Salad
' I'm not a great photographer at the best of times but my camera is starting to die (rather like your kitchen appliances... do KitchenAid make a camera as well?) '


Ingredients
1/4 queensland blue pumpkin, skinned and diced
1 medium kumara (sweet potato),  diced
2 garlic cloves, roughly chopped
2 tbsp olive oil
1/4 cup semi dried tomatoes,  roughly chopped
200g feta cheese, ecrumbled
pepper, to taste


Method
Preheat oven to 180 degrees c

Toss kumara and garlic cloves in olive oil and put in an oven dish to start roasting.

After five minutes add the pumpkin, toss to coat in oil and add extra oil if needed.

After twenty minutes (or when it looks done to you – depending on the size of your diced vegetables!
) remove from the oven and add the semi dried tomatoes, crumbled feta and some black pepper.

Serve hot, warm or cold… it also reheats well but you will need to add more feta when serving.

Variations
  • After it cools a little add it to a bed of baby spinach leaves and toss.
  • Cook some couscous and add it to the warm mix, makes a heartier meal for vegetarians or a great side dish for something light (fish or chicken).


Frills in the Hills Copyright © 2009-2015