Sunday, March 13

Sunday baking project - Swedish Cardamom twisty buns


These, my friends have been on the list since December 26 - 2009.  Too, too long.  When I received Leila Lindholm's a Piece of Cake I was overwhelmed with how long my baking list was becoming!  It's truly such a beautiful book.  Beautiful.  And not one recipe has failed, not one.  If you ever feel like spoiling  yourself with a beautiful baking book, this is your one.  Thanks to my hubby for picking it up for me for Christmas in 2009... treasured forever.

I just had to share some pics of the book:

OK enough gushing and on with the recipe right?!  This recipe I have modified a little - I've shown in more 'Aussie-friendly' measurements and also I've cut down the amount of butter... truly they are beautiful with the cut, I still think there's plenty - but think of these as a 'sometimes food' OK?

The texture is rich, flavoursome, comforting and they are totally delicious, don't taste like a lot of butter and taste more of cinnamon than cardamom.


Adapted from Leila Lindholm's cardamon buns (makes 12-14)
Ingredients:


600ml milk
1/2 tsp ground cardamom
1 tb dry yeast
150g soft butter, diced
1/3 cup caster sugar
4 cups plain flour

Filling:
100g soft butter, diced
1/4 cup caster sugar
1 tsp cinnamon
1/4 tsp ground cardamom

To glaze
1 egg
1 tb golden syrup
1 tb water


Method:
In a saucepan heat your milk for a little while until it becomes tepid - (this is when little bubbles appear at the sides and it's not boiling)  Add yeast and cardamom and let it sit for about 5 minutes.

Then add sugar and butter, still well.

Pour into your flour and mix in well.  Knead for about 5 minutes by hand, 3 minutes by mixer.


When it becomes elastic and soft-dough-like stop kneading.  Place in a greased bowl and cover with clingfilm for about an hour or until it doubles in size.

Voila!  It should be super fluffy! Preheat your oven to 200 degrees c

Take out half the dough and roll it into a rectangle on a floured surface

Mix your filling and spread half off it- on the top half of the rectangle

Fold up the bottom half to cover the filling, and cut into 1 inch strips
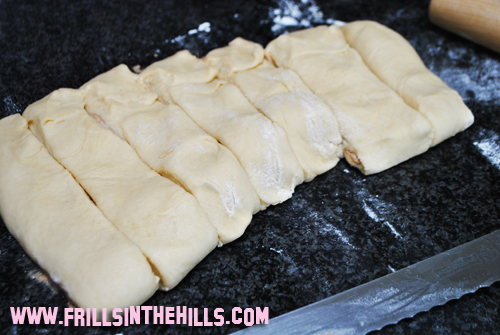
Cut a slit in each strip to to make each one into an almost 'trouser' shape

Then twist the 'trouser legs' a few times and pull them underneath to make a twisty-shape (or whatever works for you!)

Place on a greased tray and then brush with beaten egg

Bake for about 15 minutes until golden brown on top - when warm out of the oven glaze with your golden syrup/water mix.

Store in an airtight container for 3 days or in the freezer for 2 months.

And guess what?

This is officially my 52nd Sunday Baking project!  That's a WHOLE YEAR! 

Saturday, March 12

How my frills are growing up!


Just had to share this with you (and record this for me) just how much my little frills are growing up!

Eloise, who hasn't had much of a mention this year due it being her second year at school and her little sisters starting school - has had a lot going on herself.  She has started in year one in a 1/2 composite class.  Although she was one of only three of her class from last year she's settled in brilliantly peer-wise.  Last year she had some ups and downs in this area due some clashing with and instability of another student last year - it kind of tainted her school yard relationships somewhat.

But I'm happy to report that this year has been much more positive.  I'm sure it has something to do with that student no longer being at the school but also she's just that bit older and enjoys playing with lots of different people rather than just one or two.
Eloise at school friends birthday party

She's taken up recorder as part of her composite class and all parents who have a new recorder player in their family will be nodding as they read this:  it has been getting on our nerves a little. But actually she's doing less squeaking and more playing and she takes herself off to the backyard to torture the neighbours practice, it's all good.  She's loving it - it's a positive thing. really.


Having learned last year how important it is to nurture and encourage healthy and positive friendships in the first year of school - most weeks everyone has had a playdate.  If they have behaved, they may invite (or go on if they are invited) one friend home for an hour and a half after school.  Eloise totally surprised me when she wanted to invite a boy...!  But the boy had been in her class last year and was into Zhu Zhu pets like her so didn't really seem like a stretch - and I have to say - the best playdate ever - they just had so much in common.  I used to have male friends even in primary school so I guess it wasn't so out of the norm...!

Some days we've had two of the frills bring someone home for a playdate on the same afternoon and that's been a little crazy!  I let them run around like mad in our garden (Luckily it's enormous) and then chill out time before they go home (Thank you Barbie movies!)

And this next week - Laura is off to a boy's house for a playdate.  He apparently is drawing pictures of her and him with love hearts so I'm guessing he's a little smitten with the unsuspecting Laura who thinks of him as 'a very nice boy from my class'.  (Don't worry Laura I was always clueless in the same situations even as an adult) Laura also has her first school party on tomorrow.  There was a little tantrum when Olivia realised she didn't get an invite but that's life!  When I explain that they don't get invites to all Eloise's classmates party I think the penny dropped.  Olivia's time will come.

In fact, she's quite a popular lass herself, another playdate invite has been accepted for Monday and she's off to a playdate at a classmate's house for the second week in a row.  She's settled in beautifully and she's the only one of my three daughters that can remember to bring all her lunchbox containers home every day.

Laura, who unlike Olivia who was writing her name at 3 years old - had been very reluctant to learn how to write her name, learn the alphabet etc before school.  Her teacher is such a great fit for her personality wise because she is very structured and presses on.  Laura, 6 weeks into school is an ACE at her sounds and has improved in all areas - writes her name well now and even insisted on writing in and on the card for her classmates birthday party.. how CUTE is this?

So suffice to say, I'm a super proud (and busy) mama of three girls.  The weekends are shorter than ever - but it's thrilling to see them develop, grow and blossom.  It really is.

Friday, March 11

Fast food on a friday: Chicken schnitzel - hubby's recipe


Whooohoo - Hello Friday!

I've had a crazy week - a crazy month really and now I'm paying for it - I have a cold.  But I'm vowing to take it easy over the weekend - I have loads of stash meals to call on which should see me through the weekend at least..!  Hubby doesn't mind cooking either - in fact he has quite a few things in his repertoire  which we request regularly.  Some of that might be because I can't be bothered, but they are also guaranteed winners.

This, is one such recipe.

We make this a kilo at a time, sometimes two. It's not an every-day type meal (as a rule I don't really crumb much!) but it's great to have on hand when you feel like some.  We'll stash some for sandwiches and chicken parmigiana, sometimes I'll cut some up and toss it through a Caesar salad or put in a wrap.  But we always eat some because truly it's cruel to make this and not eat some straight away.  Too cruel.


Ingredients:
1 kg chicken thigh fillets
1 cup plain flour
Breadcrumbs, made from 1 large white bread roll, and 1 large wholemeal roll
3 eggs, whisked
50g butter
3/4 cups canola oil


Method:
Set up a station where you can assemble your schnitzel - in the first being the flour, second being the whisked eggs, third being the breadcrumbs and an empty plate at the end..


With a mallet or meat tenderiser flatten out your thighs (hubby works very fast!)

 Then assemble.. dust well in flour

Then QUICKLY dunk in the eggs (see? he's quick!)

Then into the breadcrumbs!

And then put aside when you're ready to cook! (You could put it in the fridge for an hour or so if you need to)

When you're ready to cook heat your oil and butter in the frypan until it sizzles.  Put some paper towel/kitchen paper  on a plate to the side of your hotplate (don't let it catch on fire OK?)

Cook for 2-3 minutes each side until the schnitzel is gorgeous and golden.  

Drain on the kitchen paper and serve how you like, we like it with parsley potatoes and beans too!


Have a lovely weekend all!

Thursday, March 10

Behind the Scenes at Australian Good Taste: How recipes are chosen and how they get on the page


'Twist my rubber arm' I respond when I'm asked if I'd like a behind-the-scenes look at food prep and photo shoots for Good Taste Magazine.  I'm on the editorial team in the 'reader issue' coming out in June and I can hardly wait until it comes out!

If you've ever picked up a copy of Good Taste its photography is beautiful and totally lickable.  That's what you want when taking photos of food so I was fascinated at the process and of course, I needed some tips!

I arrive at News Magazines and we see that we're booked into studio 4.
I often wondered how the issue comes together and in what order it's planned.  Our tour-guide assistant food editor Sonja gives me the low down:

The issue is brainstormed and a theme is decided.  From there individual areas of the magazine will put forward the ideas for the issue and the editor and food editor will polish/approve the ideas and then a plan is procured.  Each part of the food editorial team takes their share of recipes to develop, and they also contract some external recipe developers.  Michelle Southan, the Food Editor usually almost always will develop and be present for the cover recipe/shoot.  Each recipe is tested, and then added to the schedule.   Stylists are engaged depending on the style of shoot and photographers and home economist/food preparation person is booked.

They have been going for a few hours when we arrive.   Jeremy the photographer, Anita the art director, Tracey the stylist and Miranda the home economist and food preparation person.  We assemble over the photo desk and see what's on the agenda:

We're here for a shoot of the Take 5 section of the magazine, where there are only five ingredients in each dish.  This is particularly challenging as we all know the distinction of food arranging/cooking...

Most dishes are shot 3+ months ahead of time, some shots like the 'In season' are sometimes shot 12 months ahead.

Here's the start of Tracey's styling - ironing the tablecloth and napkin to ensure they look pristine..

Jeremy and Anita are looking over the rest of the photos in the series, before they set up the shoot for the current photograph, to ensure there is balance - both colour-wise and items in the photos.  For example you don't want overload one photograph so it won't flow on from the others

Here is Miranda in the cooking, she has a full list of things to make!  She receives the recipes about a week in advance and is responsible for purchasing all the ingredients she will cook with.  She also does all the washing up!

Whilst Miranda is cooking away Tracey and Jeremy do the test-shoot.  This is to check all the elements are there (except the food) - the position of the items is correct etc. Then they will transfer the plate of food over and start the 'live shoot'.


They check the shot, and make any adjustments if necessary.

Tracey adds some more crumbs to the dish.

Ideally each day will produce 6 images/dishes - at times there are more but that would include a 12+ hour day... no one likes those!

It's not as easy as it looks is it?  I have new found appreciation for the magazine now, can't wait to see the images of the food we saw shot in both the June 2011 issue (I'll be in it people!) and also the November issue.

So what food magazines do you buy? Do you have a favourite?

Wednesday, March 9

Party Palooza #10 - The butterfly birthday cake


Hello!  It's hump day everyone and I'm looking forward to the slide into the weekend - aren't you?

When I made this cake for Eloise's 6th birthday last June, many readers asked for the instructions - well that time has come!  I made it again for another little lady's 6th birthday - Stephanie, the child who only eats my cake!  She requested the cake so that's easy for me!


Cake
First of all, I used a double mix of my butter cake, and baked it in a round tin - the day before.  I froze it overnight before decorating.  It's easier to cut semi-frozen and much easier to ice.  Less crumbs.  Crumbs are the enemy of icing you know...


Icing
The icing is 200g softened butter with 3 cups of icing sugar, 1 tsp vanilla extract and colourings you want - plus enough milk to give it a smooth spreadable consistency - a few tablespoons in this case.


Decorations:
For this case I used the little tubes of fruit  chalky-type sweets - like mini fruit tingles - but you could use real ones.  On Eloise's cake I used fondant icing..  Plus you'll need some fairy or dollar fives.  The antennae I've used musk sticks but you could use licorice.  The body is a summer roll bar, but you could use any bar or even a row of marshmallows!  Get Creative!


Assembly
Start off by cutting your cake like this:
I've numbered them here so you can see how you assemble them to make the butterfly.

Then assemble them into the butterfly shape on the plate/board you intend to serve on. (Tip: If you're not a confident icer - cut up some 4 inch squares of baking paper and place under the edges of each piece - that way when you ice and make a mess you can just slide them out)


Then ice your cake!  I keep a cup of hot water to dip the knife in, helps you spread smooth and remove excess icing from the knife..  I also dip a cotton bud in it and clean up any bits that drop on the plate..

Then start decorating.  First the outline of the wings, then add your dollar-fives.  If they spill over where they shouldn't (see below) just use a pastry brush to brush away.

Next push the musk sticks (antennae) into the top

Lastly add your summer roll to the centre...

And isn't it pretty?

So here's the birthday girl and her cake...

She was chuffed and of course, ate all her piece... Happy birthday Stephanie!


Tuesday, March 8

Motherhood with a side of accidental martyrdom


I had the most bizarrely wonderful conversation one night last week.  Actually I had a few.  But this one in particular started at a Wynard bus station when I was on my way home from ticking something off my bucket list. (Saw and met my favourite author!)

A woman sat next to me and literally started ravishing a takeaway salad.  At 10.45pm at night.  I figured she must be a busy shiftworker or mum.  Or both.  In any case she noticed my amusement at her ravenous grabbings of salad and apologised to which I responded 'no, please, you look like you need it'.

We got talking about authors, writing, blogs (turns out she's a personal friend of these wonderful bloggers) and we got chatting about motherhood, as mothers do.

We exchanged 'war stories' and when she said she hadn't planned to have a 5 year gap between her kids but that's the way it happened - and she felt fate had stepped in because she felt she had sacrificed less of her identity to motherhood, being able to juggle an identity with a baby/child and into school before the next baby arrived.

It got me thinking.  I had such a ridiculous small break between my three girls (18 months) that I did sacrifice particularly after having Laura and Olivia my identity, and slowly but surely I'm regaining the parts of me that make me... me.

Am I a 'new' me?  With the imminent return back to work will I just take on another mask 'work me' then 'home me' - where is the 'me-me?'  I'm not sure.

What makes me --- me?  Is it internal, external, esteem, environment... everything?  I find myself 'reclaiming' things in my life (like seeing my favourite author, this month I've managed to catch up on one of his novels (one to go) which is something I've not been able to do - or rather not prioritised for the past five years.

This I like to call 'accidental martyrdom' because I immersed myself in motherhood - my children needed me - and I needed to be with them.  Not a sacrifice, I'm not a martyr - but I can see how when you come out of the fog of the 'early years' you start to realise what you have been missing out on and people may view that as 'all the stuff you gave up' to have kids.

What do you think?
[image credit]


Frills in the Hills Copyright © 2009-2015